Threat Levels
Location: Main Menu > Alarms > Threat Levels
Threat Levels allow administrators to quickly change door behavior, access permissions, and outputs across the system during elevated security situations.
When a Threat Level is activated, it can immediately modify how selected doors, readers, and outputs behave.
Overview
A Threat Level is a predefined security state that can:
•Restrict or modify access to Door Groups
•Change door behavior (Lock, Unlock, etc.)
•Activate or deactivate outputs
•Override normal system behavior
•Display a visual alert to all logged-in users
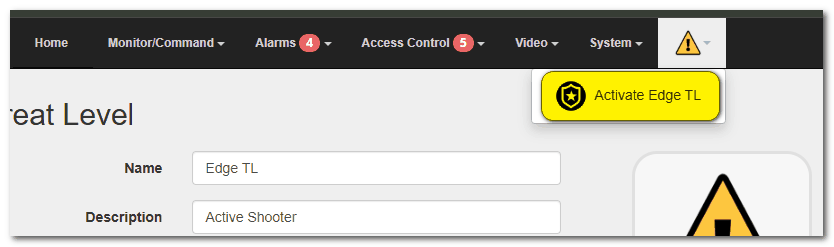
When active:
•The top menu background changes color.
•The menu bar may flash.
•The active Threat Level is visible system-wide.
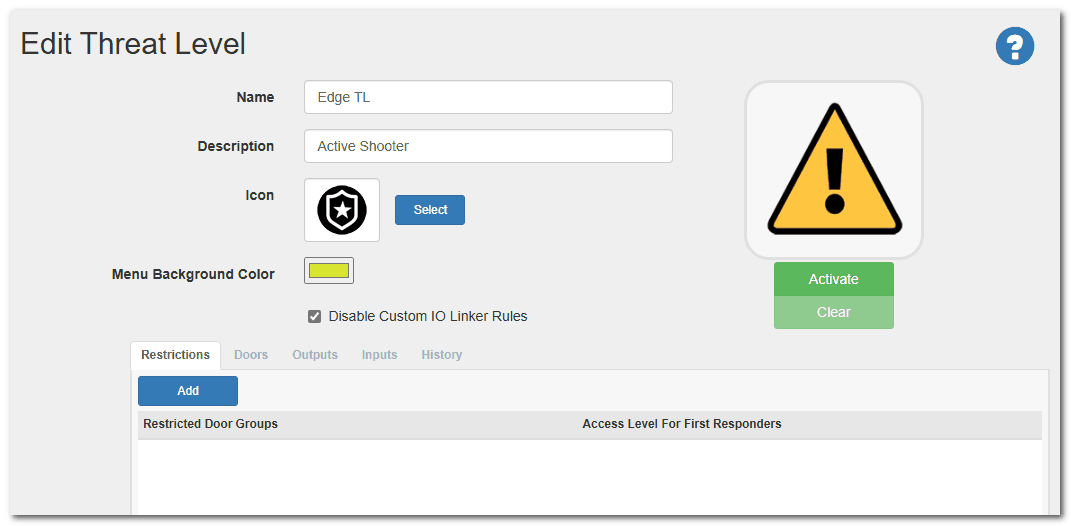
Creating a Threat Level
1.Click Create New (upper left).
2.Complete the following fields:
General Settings
•Name – Clear and descriptive (e.g., “Lockdown – Exterior Doors”)
•Description – Brief explanation of when to use this level
•Icon – Select an icon representing the threat condition
•Menu Background Color – Choose the color shown when active
•Disable Custom IO Linker Rules (if applicable to VertX/Edge hardware)
Configuring Threat Level Behavior
After creating the Threat Level, configure the following tabs:
Restrictions Tab
Defines who can access which doors during the Threat Level.
1.Click Add.
2.Select a Door Group.
3.Assign the Access Level allowed during this Threat Level.
This can restrict access to only specific personnel.
Doors Tab
Defines how selected doors behave when the Threat Level is active.
1.Click Add.
2.Select a Door Group.
3.Choose the desired Command (e.g., Lock, Unlock).
This overrides normal scheduled behavior.
Outputs Tab
Defines which outputs activate during the Threat Level.
1.Click Add.
2.Select an Output.
3.Set the desired output state.
Inputs Tab (Optional Automatic Activation)
You can configure a Threat Level to activate automatically when a specific Aero input changes state.
1.Click Add.
2.Select the Aero input to monitor.
3.Save the configuration.
When the defined input becomes active:
•The Threat Level activates automatically.
•It remains active until manually cleared through the UI.
History Tab
Displays a complete audit history of:
•Activation
•Clearing
•Configuration changes
Activating a Threat Level
Threat Levels can be activated from the user interface.
When activated:
•All defined Restrictions, Door Commands, and Outputs apply immediately.
•Menu background changes to the selected color.
•Scheduled Commands may be prevented from executing.
•Users see the active Threat Level indicator.
Clearing a Threat Level
To return the system to normal:
1.Navigate to Alarms > Threat Levels.
2.Select the active Threat Level.
3.Click Clear.
When cleared:
•Doors return to their default access modes.
•Outputs revert to normal state.
•Scheduled Commands resume normal operation.
Common Use Cases
•Emergency lockdown
•Severe weather protocol
•After-hours security escalation
•Active threat situations
•Restricted facility access
Important Considerations
•Threat Levels override normal schedules.
•Only authorized users should have permission to activate or clear Threat Levels.
•Always test Threat Levels during non-critical hours.
•Clearly define procedures for when to activate and clear each Threat Level.
•Communicate with security staff before activation.